
5 posts tagged with "api-key"

View All Tags

· 3 min read
Josh Twist

I recently got to interview Tom Carden, Head of Engineering at Rewiring America, where he spoke about how they deployed Zuplo’s API Management platform to accelerate their API program.

Rewiring America, a nonprofit focused on electrifying homes, businesses, and communities in the US, required a solution for their IRA Savings Calculator API. “The IRA is the Inflation Reduction Act here in the US” explained Tom, “that puts a bunch of tax credits and rebates in the hands of everyday consumers to help them make a choice for cleaner, safer, and just plain better electric appliances in their home. Forty-two percent of US energy-related emissions come from our homes and we can dramatically reduce that by upgrading the machines we use daily.”

The initial calculator was built as a client-side app but then started receiving requests for an API so that folks could host the functionality on their own website.

Being an experienced Engineering Manager, Tom knew that there was a lot of potential “wheel reinvention” ahead to start a new API program — requiring API authentication, rate-limiting to prevent noisy neighbor problems and abuse, and developer documentation with integrated key management; we call these the three pillars of an API program.

Tom spent some time evaluating different off-the-shelf options before selecting Zuplo to help them get their API to market quicker. “I think I was originally evaluating Zuplo as a documentation host. But once I understood that it was a gateway that could deal with API key management, validation, rate limiting, and also had a long tail of programmable plugins; I was pretty much sold at that point but went off to do my due diligence on alternatives nonetheless.”

Zuplo helped Tom and his team move faster than the alternatives thanks to the focus on developer experience with real-time feedback (press save, and your changes are live to test) and offered a gitops integration with GitHub, meaning they could deploy multiple environments to the edge in seconds.

Tom also described the value of using Zuplo versus building a solution in-house, saving weeks of engineering time and avoiding ongoing maintenance costs. “We could bring this stuff in-house and get something good enough. But I look at that as opportunity costs, we're not solving the problems that are unique to our organization. We're spending time reinventing the wheel. So I'd rather buy.”

With Zuplo's help, Rewiring America can focus on its mission to help Americans upgrade the machines they depend on and avoid reinventing the wheel when it comes to offering a great developer experience to users of their API.

· One min read
Josh Twist

UPDATE See this post for a detailed walkthrough Shipping a ChatGPT plugin in record time

OpenAI recently announced Chat Plugins for Chat GPT.

To make a plugin you just need an API with an accompanying OpenAPI definition that the Chat GPT. The plugin engine is especially impressive - don't take my word for it; here's Mitchell Hashimoto, Founder of HashiCorp:

Tweet from Mitchell Hashimoto

See tweet here

If you already have an API and are excited to make it into a Chat GPT plugin there's a few things you'll need to do

  • Authentication - support auth with an API Key or OAuth2 client-id and secret.
  • OpenAPI - offer an OpenAPI definition so GPT can understand your API
  • Rate-limiting - add rate-limiting to your API (with retry-after) so OpenAI don't over-consume your resources

Fortunately, Zuplo is here to help. Zuplo is an API Gateway that natively supports OpenAPI (you can generate it using our route designer or import your own). What's more we make it easy to support API key authentication and rate-limiting, making it the fastest and easiest way for you to surface your plugin to OpenAI.

Get started for free, sign-up at https://portal.zuplo.com.

· 5 min read
Josh Twist

OpenAI is all the rage now and developers are rushing to leverage this technology in their apps and SaaS products. But such is the demand for this stuff, you might need to think about how you protect yourself from abuse - here's a post from a colleague I saw on LinkedIn recently:

LinkedIn comment

You can use a Zuplo gateway to store your API keys and enforce a number of layers of protection to discourage abuse of your OpenAI API keys.

How it works

Zuplo Gateway for OpenAI

Zuplo allows you to easily perform authentication translation, that is, change the authentication method your clients use. For example you might require your clients to use

  • JWT tokens
  • API Keys issued to each of your customers (different to your OpenAI key, so you can identify each individual customer)
  • Anonymously in a web browser — but ensure the call is coming from the right origin, enforce CORS and rate-limit by IP etc.

Setting up Zuplo to send the API Key

This is a CURL command to call the OpenAI API directly, note the need for an API KEY

curl https://api.openai.com/v1/completions \
-H 'Content-Type: application/json' \
-H 'Authorization: Bearer YOUR_API_KEY_HERE' \
-d '{
"model": "babbage",
"prompt": "Say this is a test",
"max_tokens": 7,
"temperature": 0
}'

To get started we'll create a simple Zuplo gateway that removes the need to specify the API key.

Create a new project and add a route:

  • Summary: My OpenAI Completions
  • Path: /v1/my-completions
  • Method: POST
  • CORS: No CORS
  • Handler: URL Rewrite - https://api.openai.com/v1/completions

Next, we need to add a policy that will set the authorization header when calling OpenAI. Open the Policies section and click Add Policy.

Add or Set Request Headers

Choose the Add or Set Request Headers policy. Set the policy configuration as follows

{
"export": "SetHeadersInboundPolicy",
"module": "$import(@zuplo/runtime)",
"options": {
"headers": [
{
"name": "authorization",
"value": "Bearer $env(OPEN_AI_API_KEY)",
"overwrite": true
}
]
}
}

Note that we will read the API Key from a secure secret stored as an environment variable - go setup your OPEN_AI_API_KEY env var.

Save your changes, and we're ready.

Take the above curl command and remove the authorization header and change the URL to your project URL:

curl https://open-ai-main-298dc8d.d2.zuplo.dev/v1/my-completions \
-H 'Content-Type: application/json' \
-d '{
"model": "babbage",
"prompt": "Say this is a test",
"max_tokens": 7,
"temperature": 0
}'

Look no API key 👏 - but your request should work fine as Zuplo will add the key on the way out.

Securing Zuplo

You now have several choices to secure Zuplo.

  1. Require your users to login (with a service like Auth0) and then use an Auth0 JWT with Zuplo.
  2. Issue API Keys to all your users using Zuplo's API Key Service.
  3. Host anonymously but add additional safe guards, including requiring a specific Origin and strict CORS using custom CORS policies.

Make sure to add rate limiting - based on user or maybe IP (for anonymous use case).

Event Streaming (data-only server-sent events)

OpenAI supports event streaming, this is easy to get working with Zuplo and works out of the box. You can try this by adding a stream: true property to your POST to OpenAI:

curl https://open-ai-main-298dc8d.d2.zuplo.dev/v1/my-completions \
-H 'Content-Type: application/json' \
-d '{
"model": "babbage",
"prompt": "Say this is a test",
"max_tokens": 7,
"temperature": 0,
"stream": true
}'

However, what if you want to support EventSource in the browser? That is easy to accomplish with Zuplo also by taking the incoming GET request created by EventSource and translating it into a POST request, with the appropriate headers and body inside Zuplo.

tip

Event streaming doesn't work fully on 'working-copy' but works great on your 'edge deployments'. Read more about environments to promote to an edge deployment.

Create a new route:

  • Summary: My OpenAI Completions for Browser Event Source
  • Path: /v1/my-browser-completions
  • Method: GET
  • CORS: Anything Goes
  • Handler: URL Rewrite - https://api.openai.com/v1/completions

Add the following policies

  • Reuse your Set Header policy that sets the authorization key above.
  • Add a Change Method policy to update the request to be a POST
  • Add another Set Header policy to set the content-type header to application/json
  • Finally, add a Set Body policy with the following configuration.

Policies

{
"export": "SetBodyInboundPolicy",
"module": "$import(@zuplo/runtime)",
"options": {
"body": "{ \"model\": \"babbage\", \"prompt\": \"Say this is a test\", \"max_tokens\": 7, \"temperature\": 0, \"stream\": true }"
}
}

You can now use an EventSource in a browser and call Zuplo as follows

const evtSource = new EventSource(
"open-ai-main-298dc8d.d2.zuplo.dev/v1/my-browser-completions"
);

evtSource.onmessage = (evt) => {
if (evt.data === "[DONE]") {
console.log("end of event stream...");
return;
}
console.log(JSON.parse(evt.data));
};

You could also make the POST body dynamic, based on a querystring in the EventSource - you would then read the querystring values in a custom policy and set the body based on values in the querystring (you would no longer need the Set Body policy in this case).

The custom code (inbound policy) might look like this

import { ZuploContext, ZuploRequest } from "@zuplo/runtime";

export default async function (
request: ZuploRequest,
context: ZuploContext,
options: never,
policyName: string
) {
const prompt = request.query.prompt;

// perform any appropriate validation on `prompt` here

const data = {
model: "babbage",
prompt, // pass the query value in here
max_tokens: 7,
temperature: 0,
};

return new ZuploRequest(request, {
body: JSON.stringify(data),
});
}

· 2 min read
Josh Twist

We just published a new video showing how you can add smart routing, behind a single common API for multiple backends, in 1 page of TypeScript. Metadata is loaded from an external service (in this case, Xata but you could use Supabase, Mongo etc).

Here's the code used in the demonstration:

import {
ZuploContext,
ZuploRequest,
environment,
ZoneCache,
} from "@zuplo/runtime";

interface RouteInfo {
customerId: string;
primaryUrl: string;
secondaryUrl?: string;
}

const CACHE_KEY = "ROUTE_RECORDS";
const CACHE_NAME = "ROUTE_INFO";

async function loadRouteInfoFromApi(context: ZuploContext) {
const cache = new ZoneCache(CACHE_NAME, context);

const records = await cache.get(CACHE_KEY);

if (!records) {
const options = {
method: "POST",
headers: {
Authorization: `Bearer ${environment.XATA_API_KEY}`,
"Content-Type": "application/json",
},
body: '{"page":{"size":15}}',
};

const response = await fetch(
"https://YOUR-XATA-URL.xata.sh/db/test:main/tables/routing/query",
options
);

const data = await response.json();
cache.put(CACHE_KEY, data.records, 300); // 5 minutes

context.log.info("RouteInfo loaded from API");
return data.records;
}

context.log.info("RouteInfo loaded from Cache");
return records;
}

export default async function (request: ZuploRequest, context: ZuploContext) {
const customerId = request.user.data.customerId;

const routing = await loadRouteInfoFromApi(context);

const routeInfo = routing.find((r) => r.customerId === customerId);

if (!routeInfo) {
return new Response(`No route found for customer '${customerId}'`, {
status: 404,
});
}

const response = await fetch(routeInfo.primaryUrl);
if (response.status !== 200 && routeInfo.secondaryUrl) {
context.log.info(
`First request failed, trying secondary (${response.status})`
);
const response2 = await fetch(routeInfo.secondaryUrl);
return response2;
}

return response;
}

Got questions or feedback? Join us on Discord.

· 7 min read
Josh Twist

Supabase is an incredible open-source alternative to Firebase and other BaaS (Backend-as-a-service) options. The design is somewhat optimized for consumption by first-party clients like your own website or mobile app. But what if you wanted to take all that supa-ness and make an API-first product — that is a developer-friendly public API?

There is an accompanying video for this post: https://www.youtube.com/watch?v=GJSkbxMnWxE

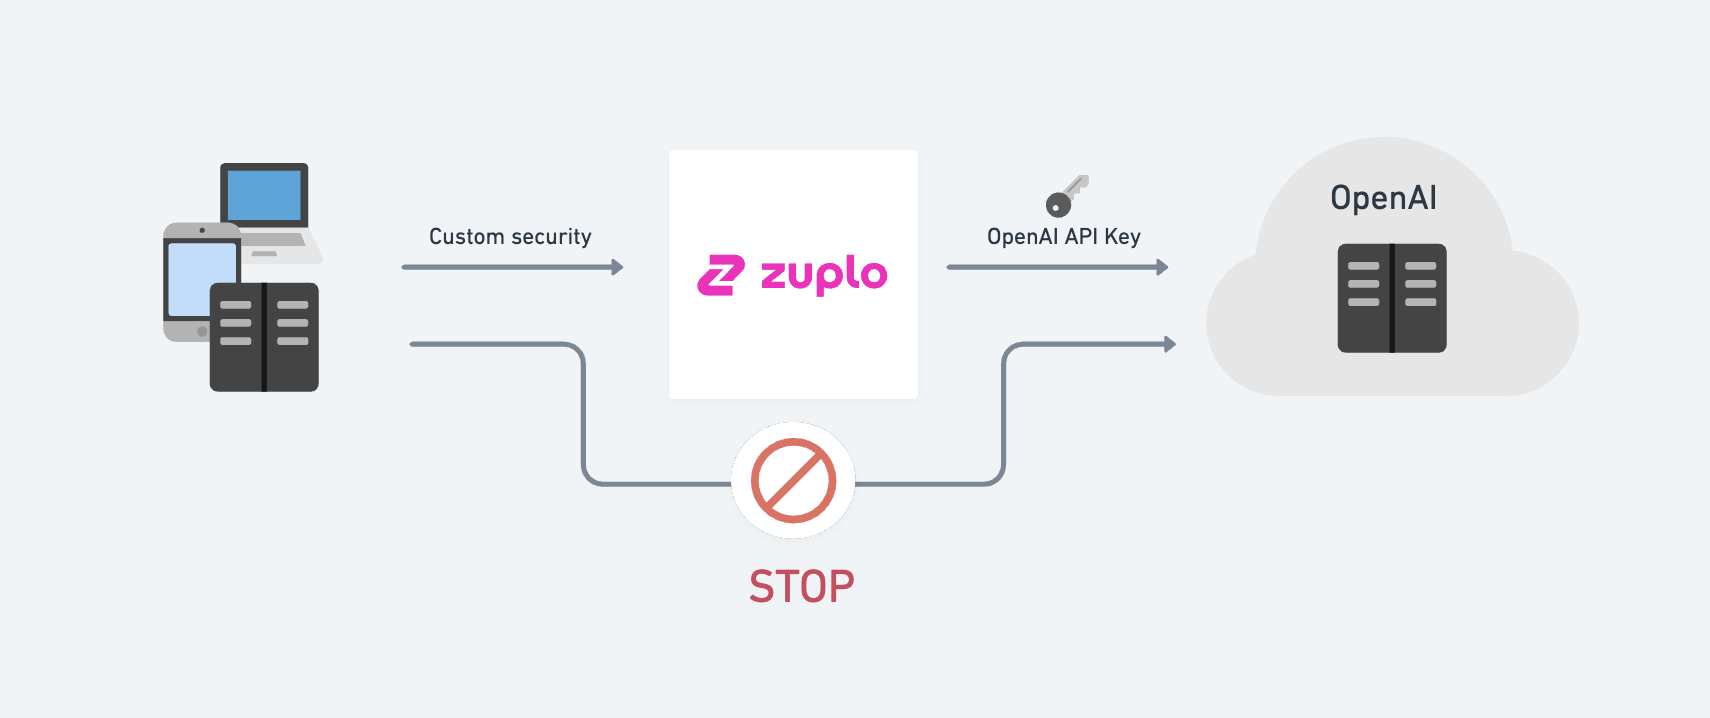
This is where Zuplo can help. Zuplo is the fastest way to get your API to market and get a Stripe-quality experience with the three critical pillars of any API program:

  • authentication
  • protection (rate-limiting, firewall)
  • documentation

zuplo layout

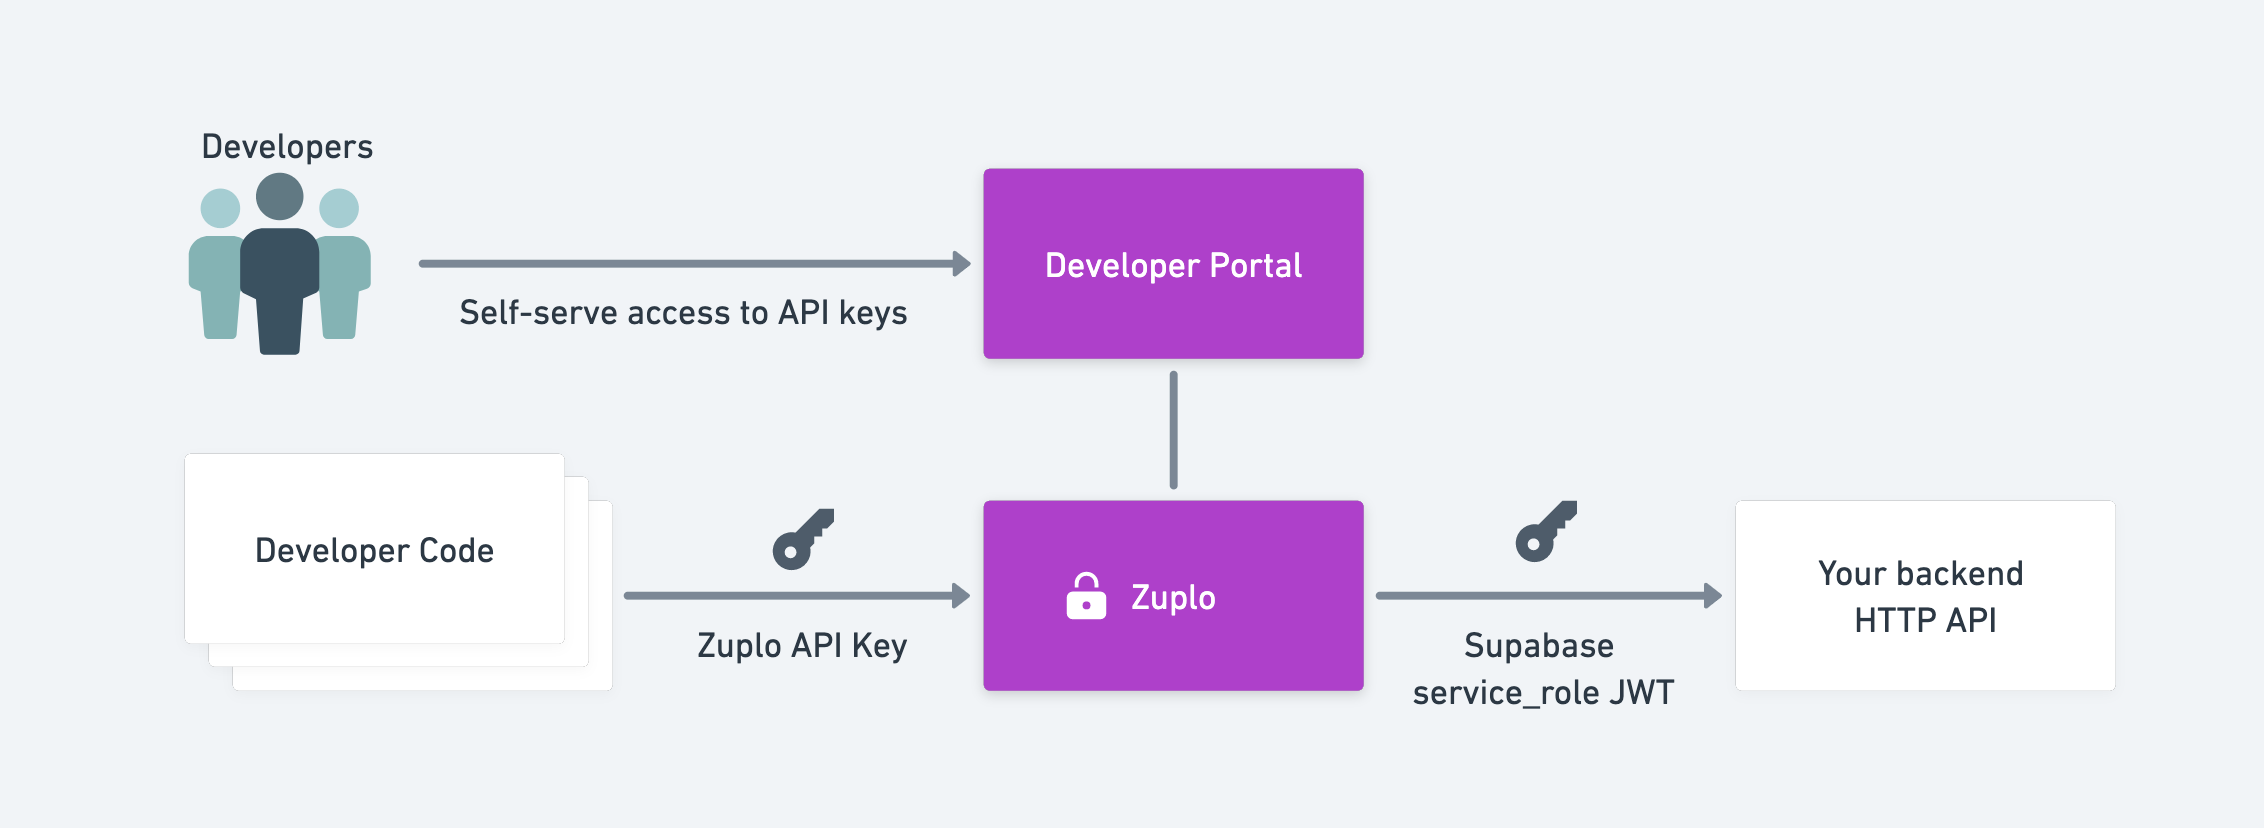
In this example I'm going to work with a simple table that allows people to read and write entries to a supabase table that contains some reviews of skis (yes, I love to ski). Because this is an API for developers, they may be calling it from some backend service and can't login using the standard supabase method. This is where API keys are a much better choice - see Wait, you're not using API keys?.

We'll allow people, with a valid API key, to read data from the ski results table and to create new records. Hopefully it's obvious that there are many ways you can extend this example to add more behavior like roles based access, with custom policies, custom handlers and more. Come join us on Discord if you have questions or need inspiration.

Setting up Supabase

If you haven't already, create a new project in supabase and create a table called ski-reviews with the following columns (feel free to use another domain and invent your own example):

  • id (int8)
  • created_at (timestamptz)
  • make (varchar)
  • model (varchar)
  • year (int8)
  • rating (int2)
  • author (varchar)

Manually enter a couple of rows of data - so we have something to read from the DB.

The read all reviews route in Zuplo

Create a new project in Zuplo - I went with supabase-ski-reviews.

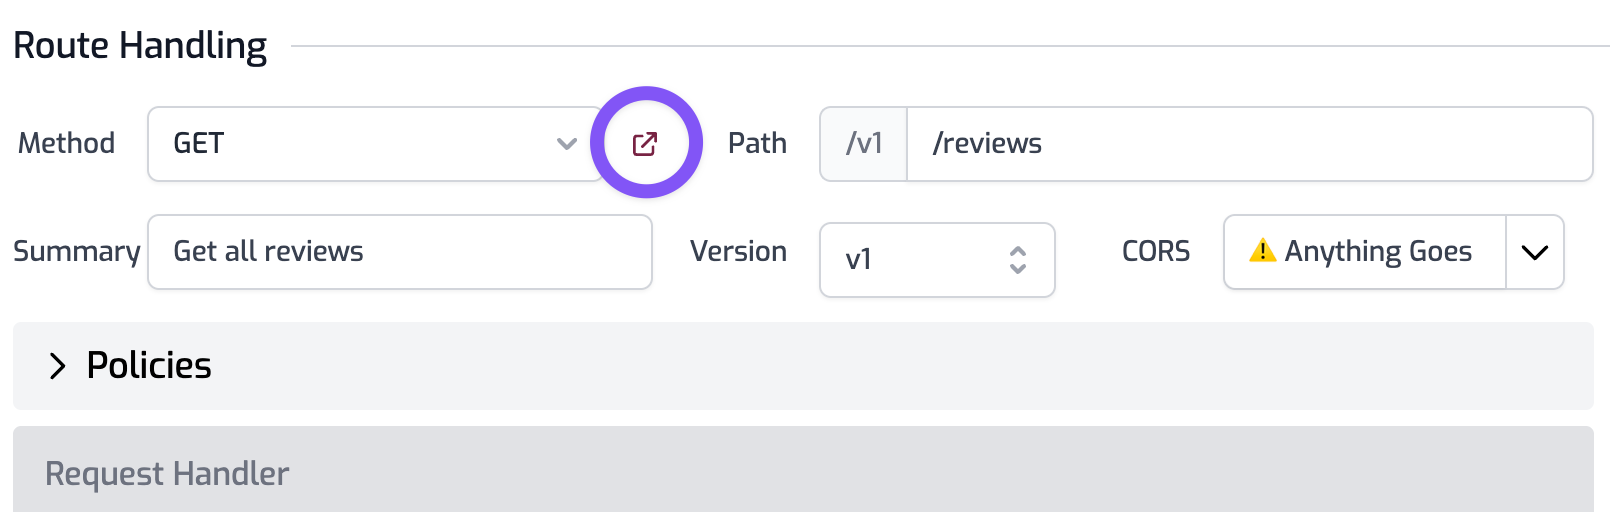
Select the File tab and choose Routes. Add your first route with the following settings:

  • method: GET
  • path: /reviews
  • summary: Get all reviews
  • version: v1
  • CORS: Anything goes

And in the request handler section, paste the READ ALL ROWS URL of your supabase backend (you can get to this in the **API docs section of Supabase)

  • URL Rewrite: https://YOUR_SUPABASE_URL.supabase.co/rest/v1/ski-reviews?select=*
  • Forward Search: unchecked

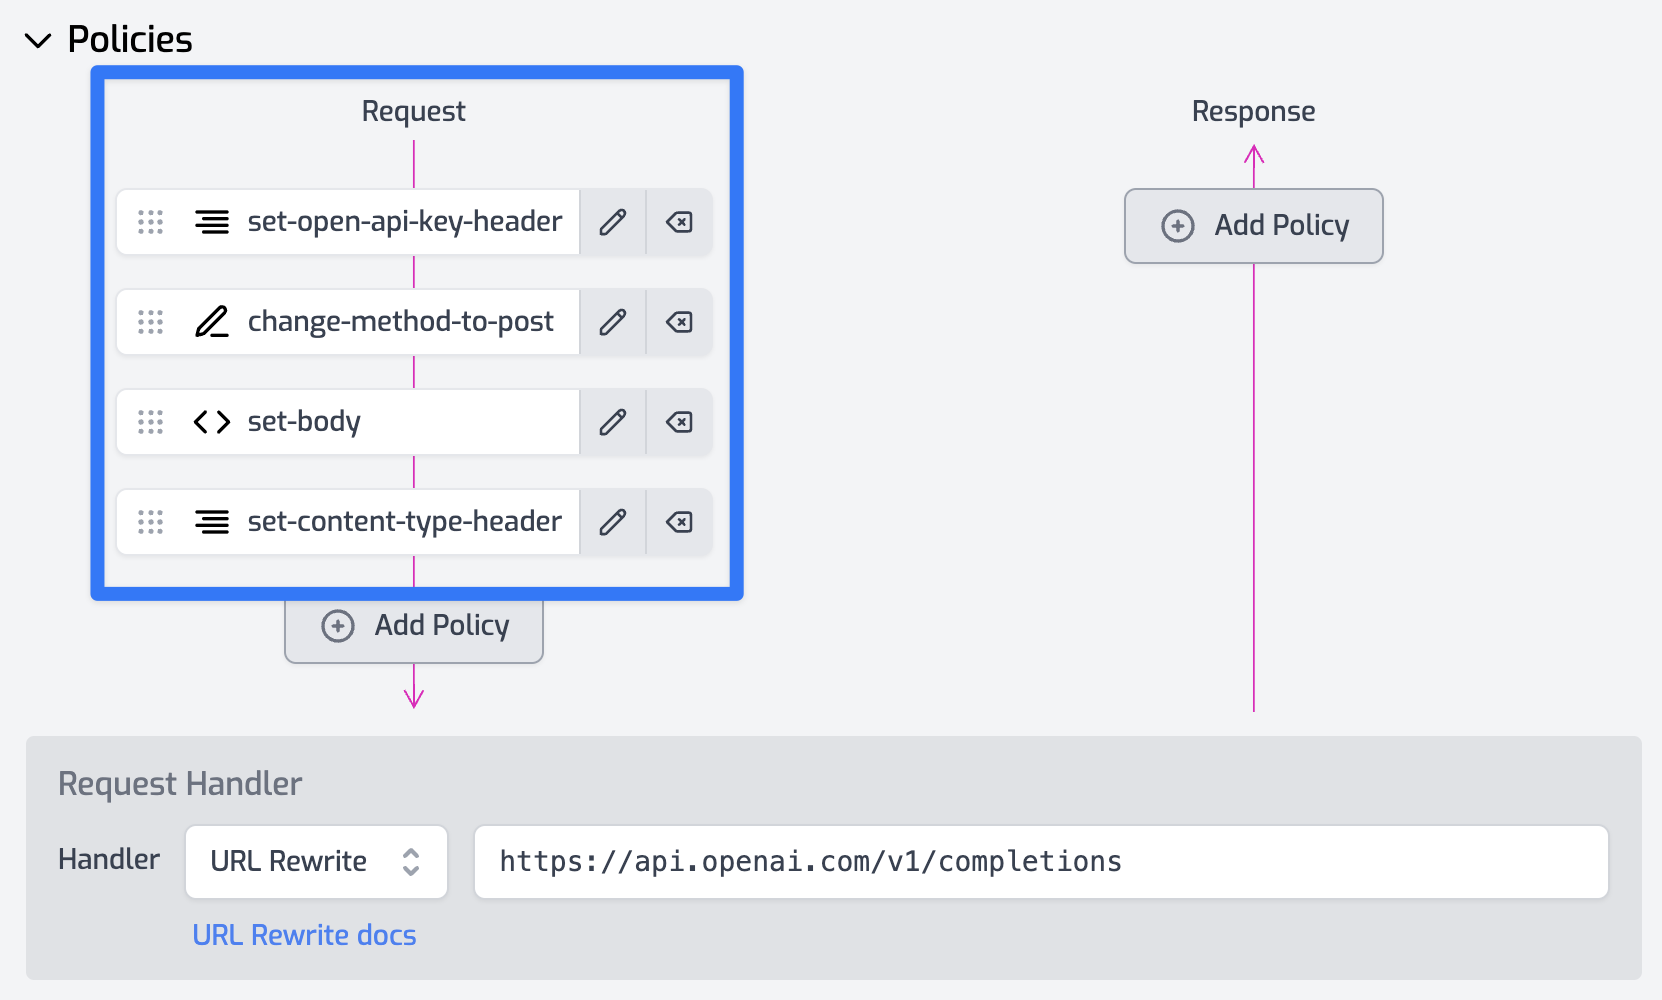
In order to call the supabase backend I need to add some authentication headers to the request before we call supabase.

Expand the Policies section of your route. Click Add policy on the Request pipeline.

First, we don't want to forward any old headers that the client sends us to Supabase so find the Clear Headers Policy and add that to your inbound pipeline. Note, that we will allow the content-type header to flow through, so this should be your policy config.

{
"export": "ClearHeadersInboundPolicy",
"module": "$import(@zuplo/runtime)",
"options": {
"exclude": ["content-type"]
}
}

Next, we need to add the credentials to the outgoing request. We'll need to get the JWT token from supabase - you'll find it in Settings > API as shown below:

secret_role jwt

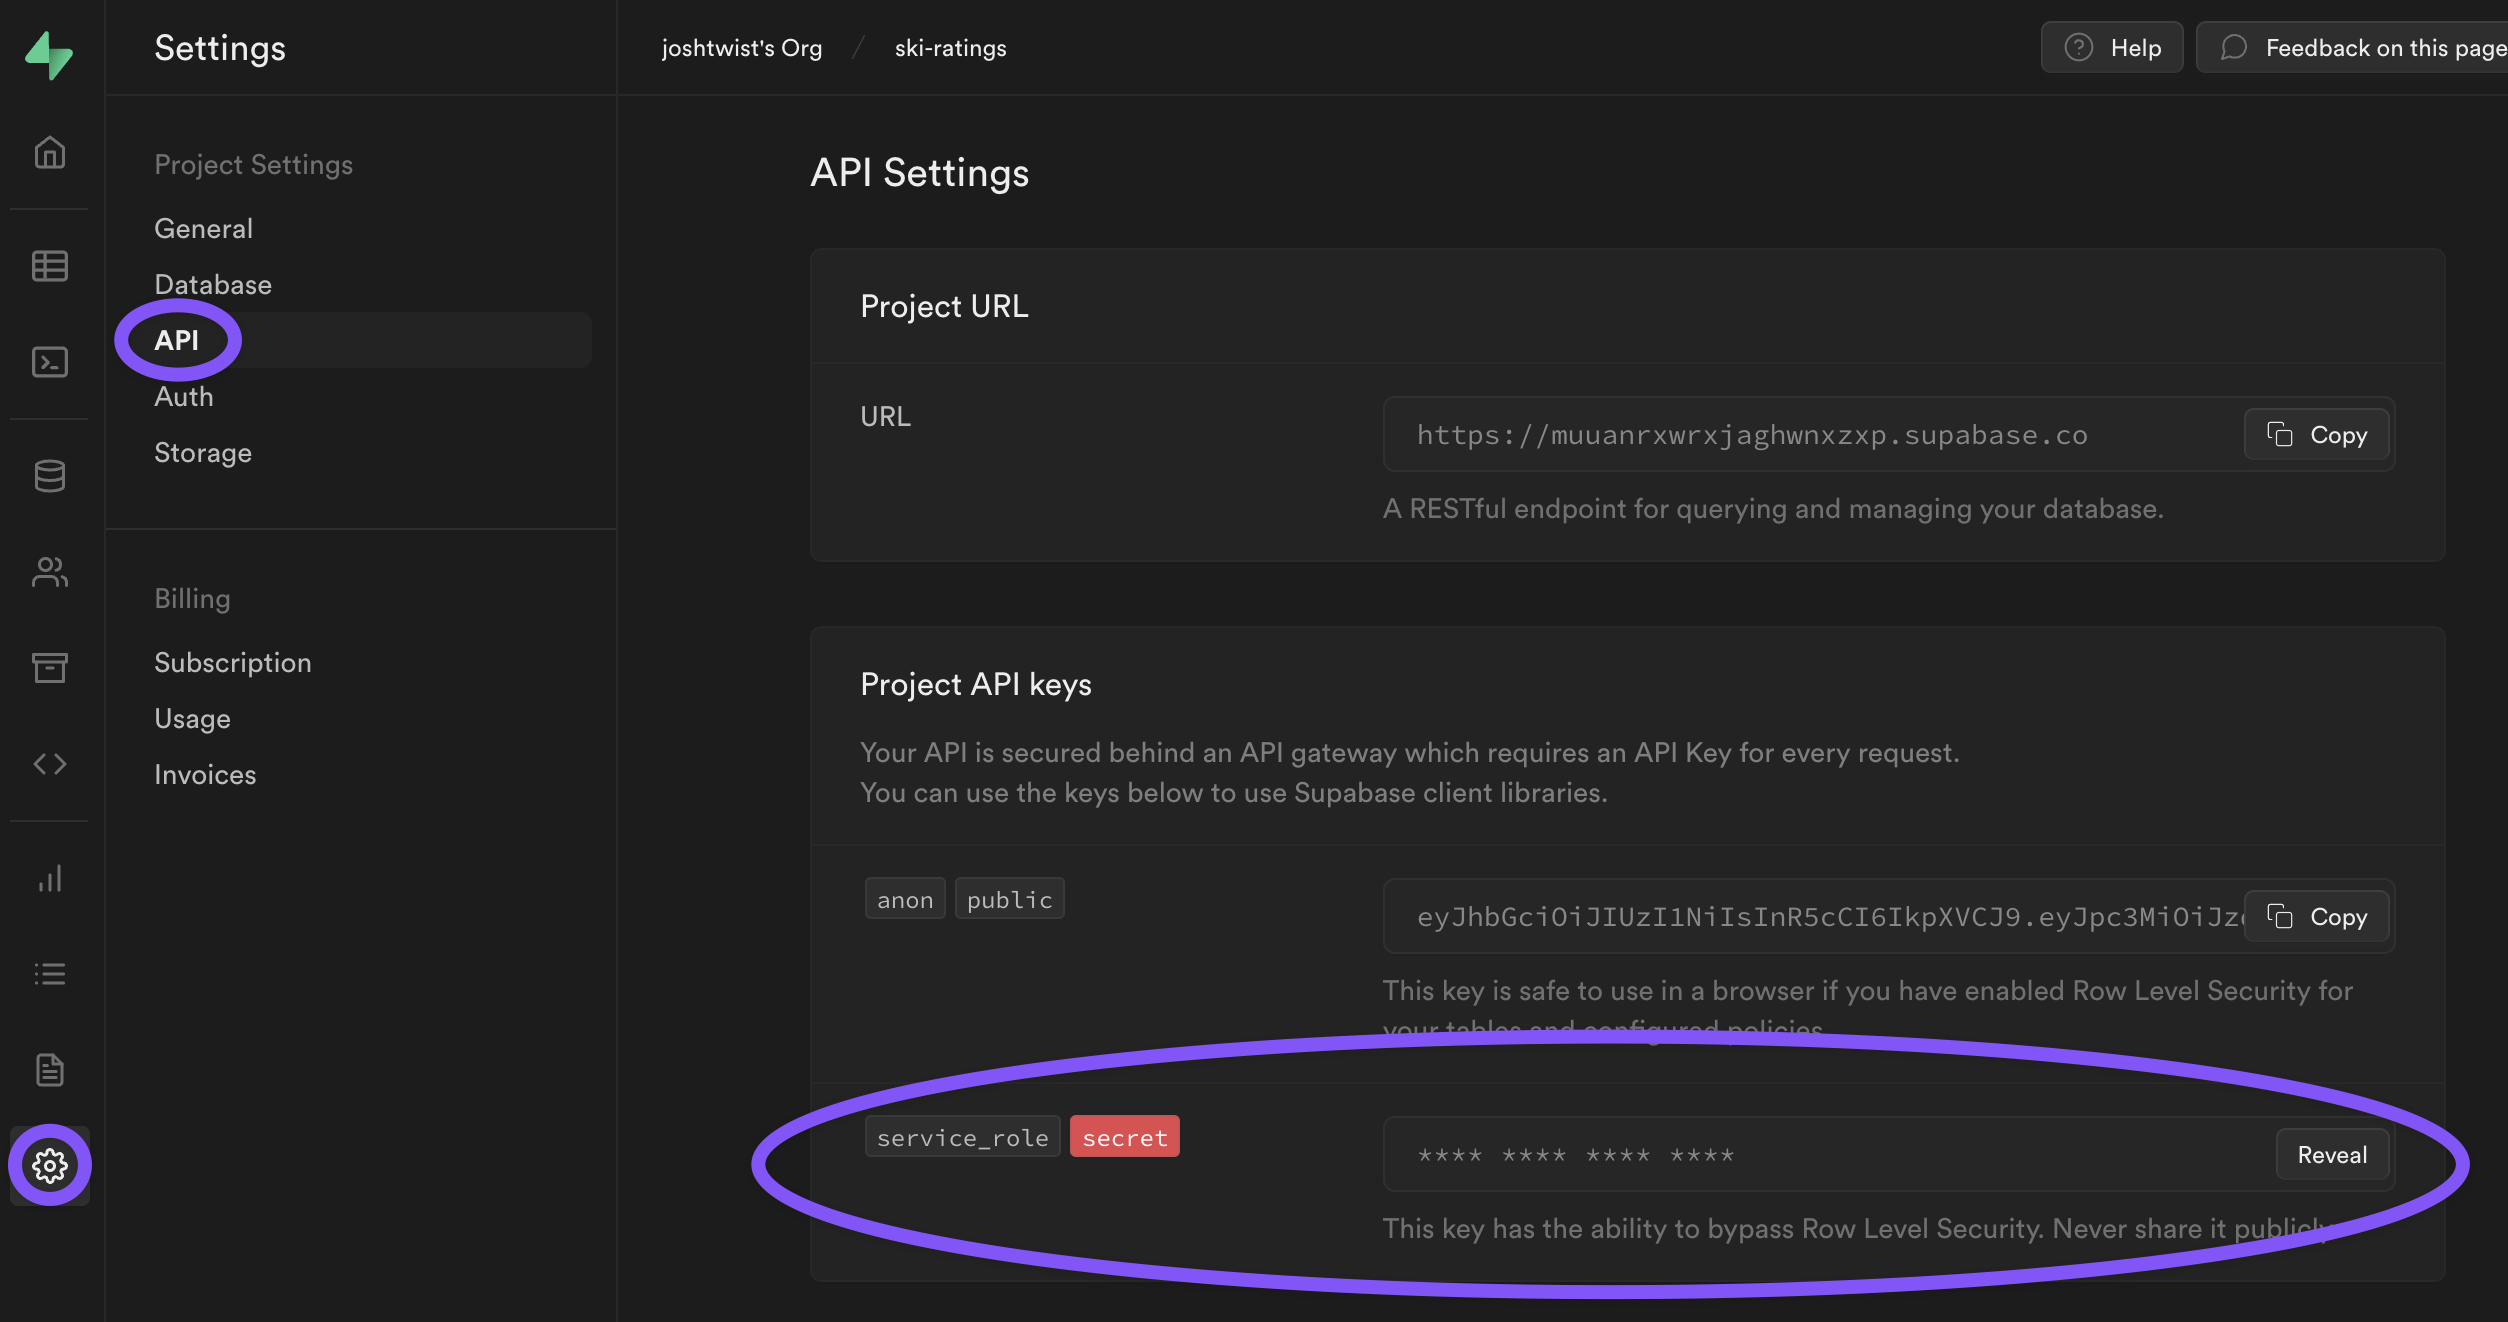
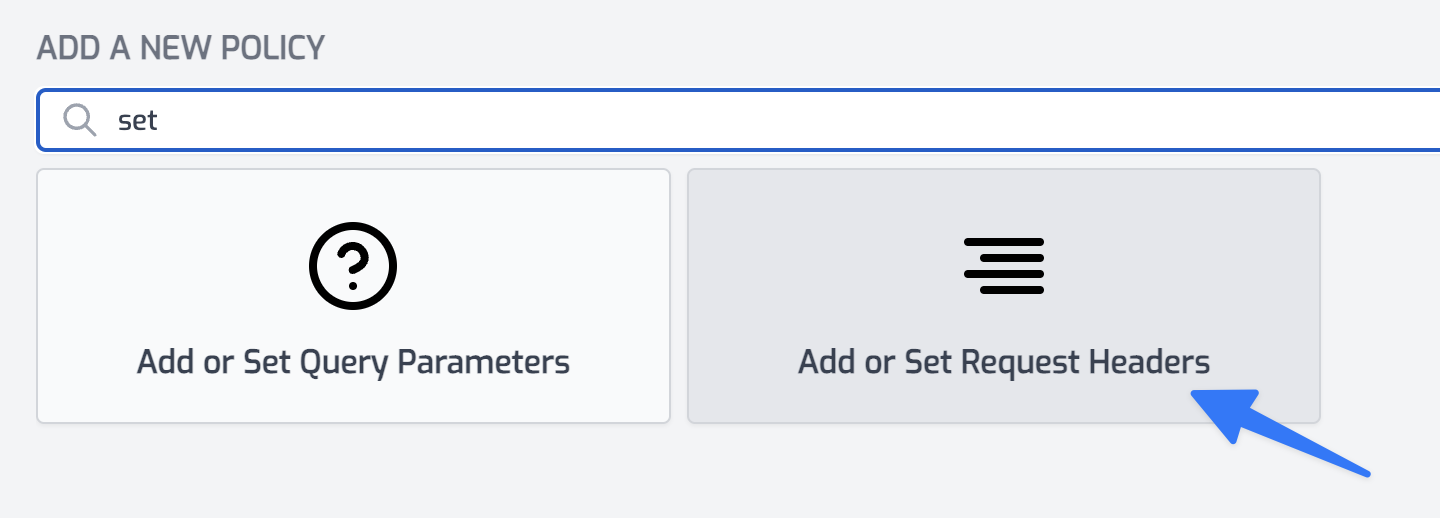
Once you've got your service_role JWT, click Add Policy again on the Request pipeline and choose the Add/Set Headers Policy and configure it as follows:

{
"export": "SetHeadersInboundPolicy",
"module": "$import(@zuplo/runtime)",
"options": {
"headers": [
{
"name": "apikey",
"value": "$env(SUPABASE_API_KEY)",
"overwrite": true
},
{
"name": "authorization",
"value": "$env(SUPABASE_AUTHZ_HEADER)",
"overwrite": true
}
]
}
}

Save your changes.

Next, create two secret environment variables as follows:

  • SUPABASE_API_KEY: "YOUR_SUPABASE_SECRET_ROLE_JWT"
  • SUPABASE_AUTHZ_HEADER: "Bearer YOUR_SUPABASE_SECRET_ROLE_JWT"

Obviously, in both instances replace YOUR_SUPABASE_SECRET_ROLE_JWT with your service_role JWT from supabase.

You are now ready to invoke your API gateway and see data flow through from Supabase!

Click on the open in browser button shown below and you should see the JSON, flowing from supabase in your browser 👏.

open in browser

Adding authentication

At this point, that route is wide open to the world so we need to secure it. We'll do this using API keys. You can follow this guide Add API key Authentication. Be sure to drag the API Key authentication policy to the very top of your Request pipeline. Come back here when you're done.

Welcome back! You've now learned how to secure your API with API-Keys.

Adding a Create route

Next we'll add a route that allows somebody to create a review. Add another route with the following settings

  • method: POST
  • path: /reviews
  • summary: Create a new review
  • version: v1
  • CORS: Anything goes

And the request handler as follows:

  • URL Rewrite: https://YOUR_SUPABASE_URL.supabase.co/rest/v1/ski-reviews
  • Forward Search: unchecked

Expand the policies section and add the same policies (note you can reuse policies by picking from the existing policies at the top of the library)
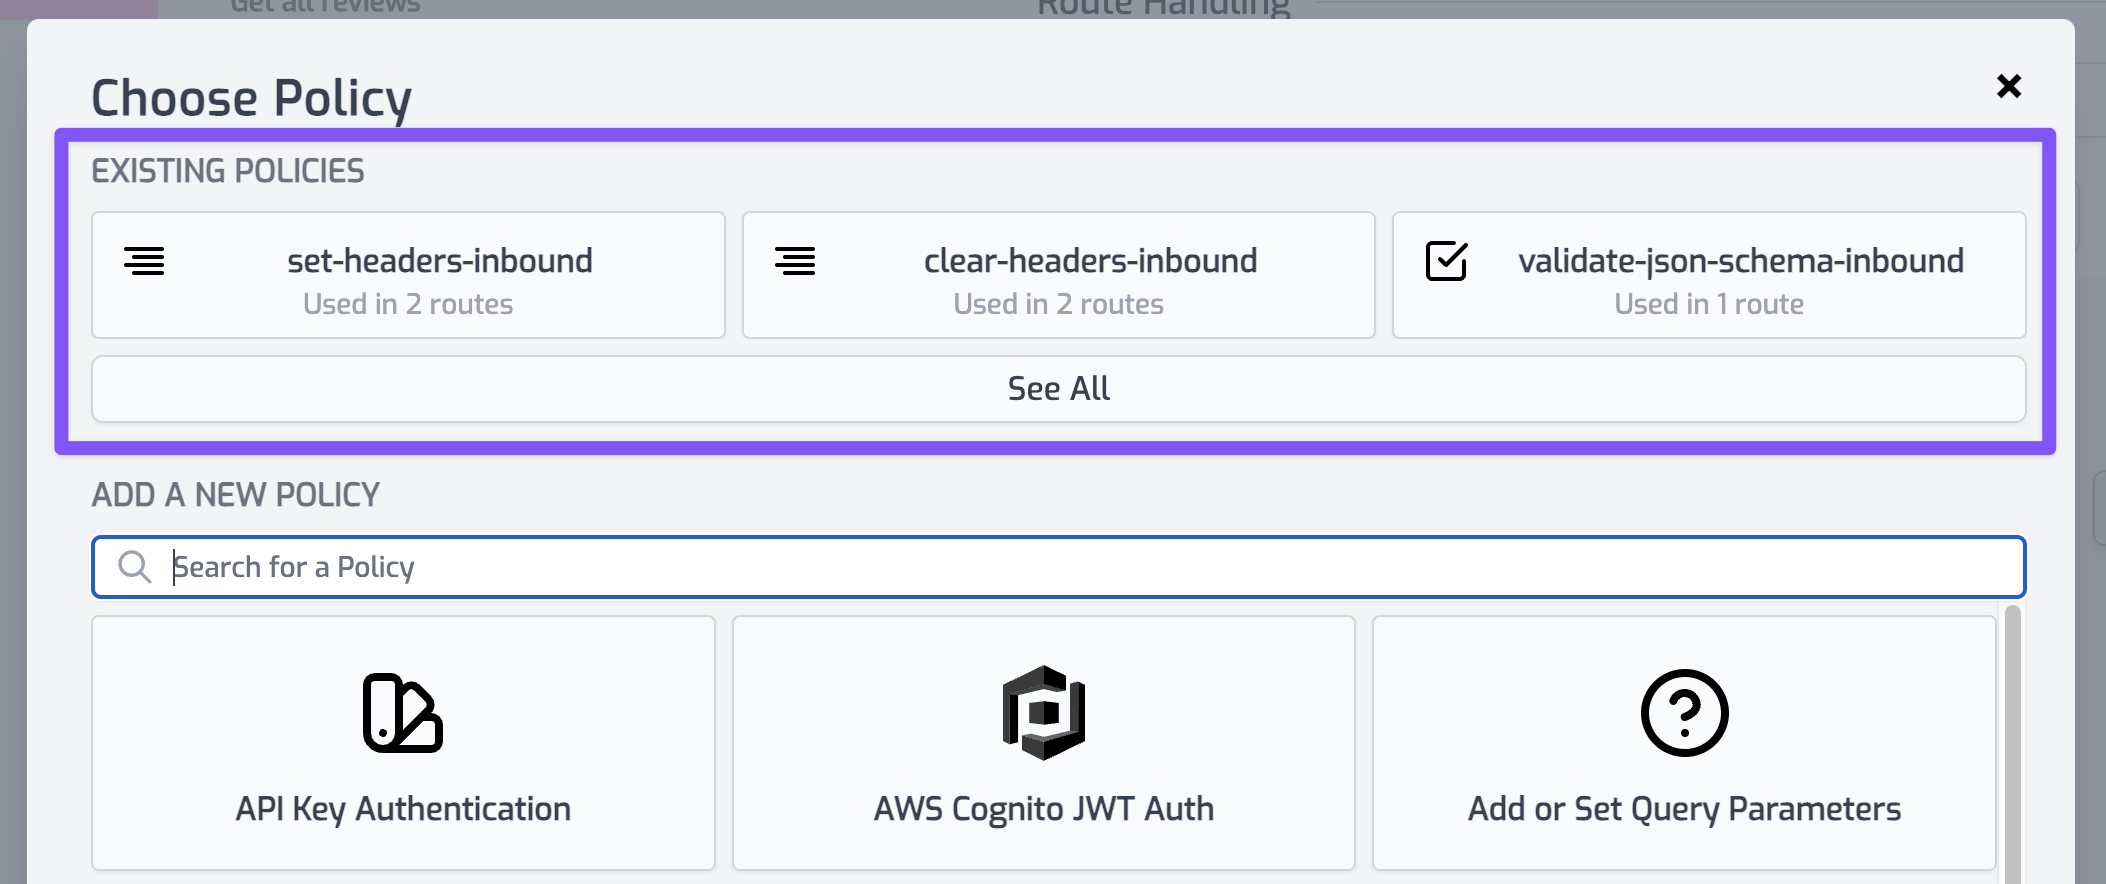
existing policies

  • api-key-inbound
  • clear-headers-inbound
  • set-headers-inbound

Now your create route is secured, will automatically set the right headers before calling supabase. That was easy.

You can test this out by using the API Test Console to invoke your new endpoint. Go to the API Test Console and create a new test called create-review.json.

  • Method: POST
  • Path: /v1/reviews
  • Headers:
    • content-type: application/json
    • authorization: Bearer YOUR_ZUPLO_API_KEY
  • Body:
{
"make": "Rossignol",
"model": "Soul HD7",
"rating": 5,
"year": 2019
}

Test console

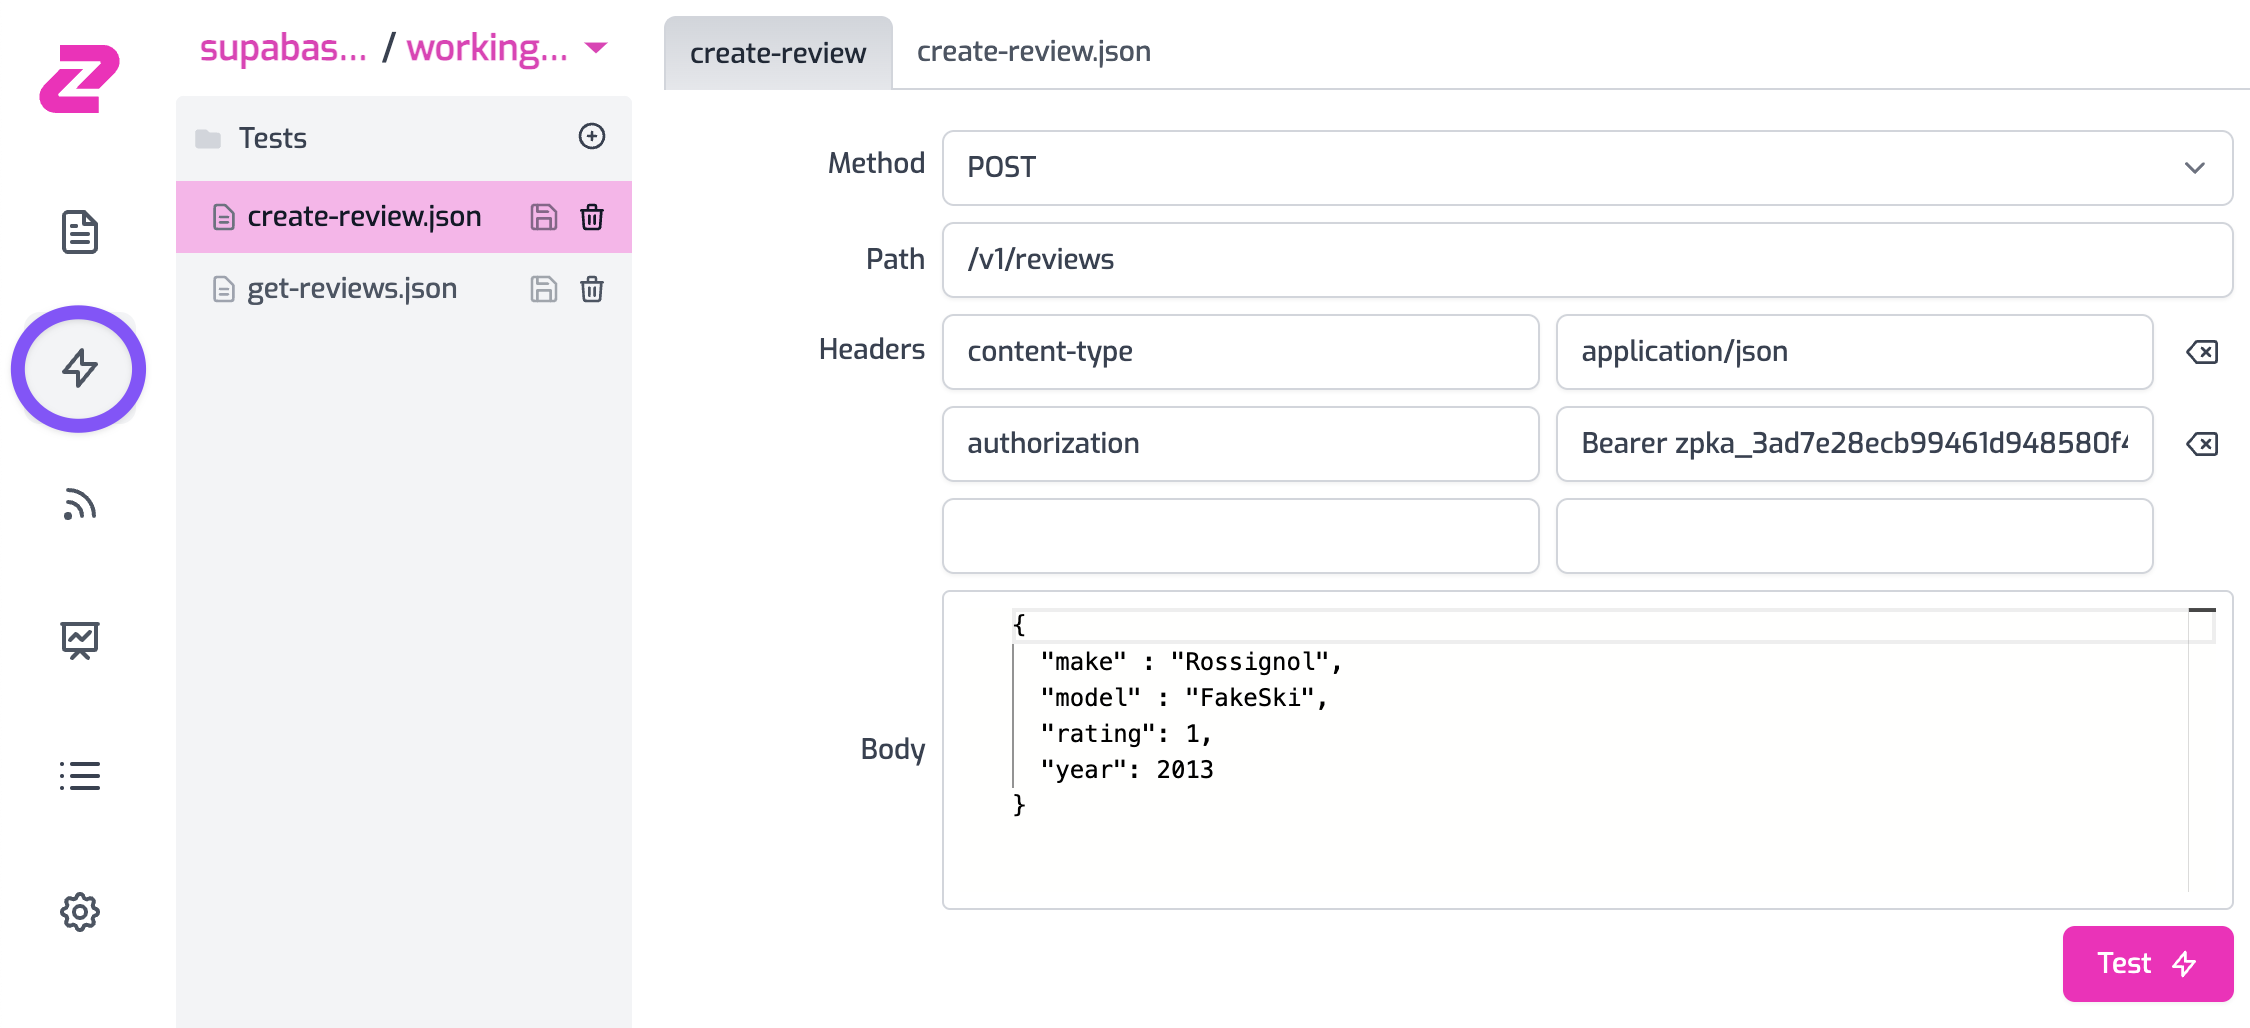
If you invoke your API by clicking Test you should see that you get a 201 Created - congratulations!

Add validation to your post

To make your API more usable and more secure it is good practice to validate incoming requests. In this case we will add a JSON Schema document and use it to validate the incoming body to our POST.

Create a new schema document called new-review.json.

new schema

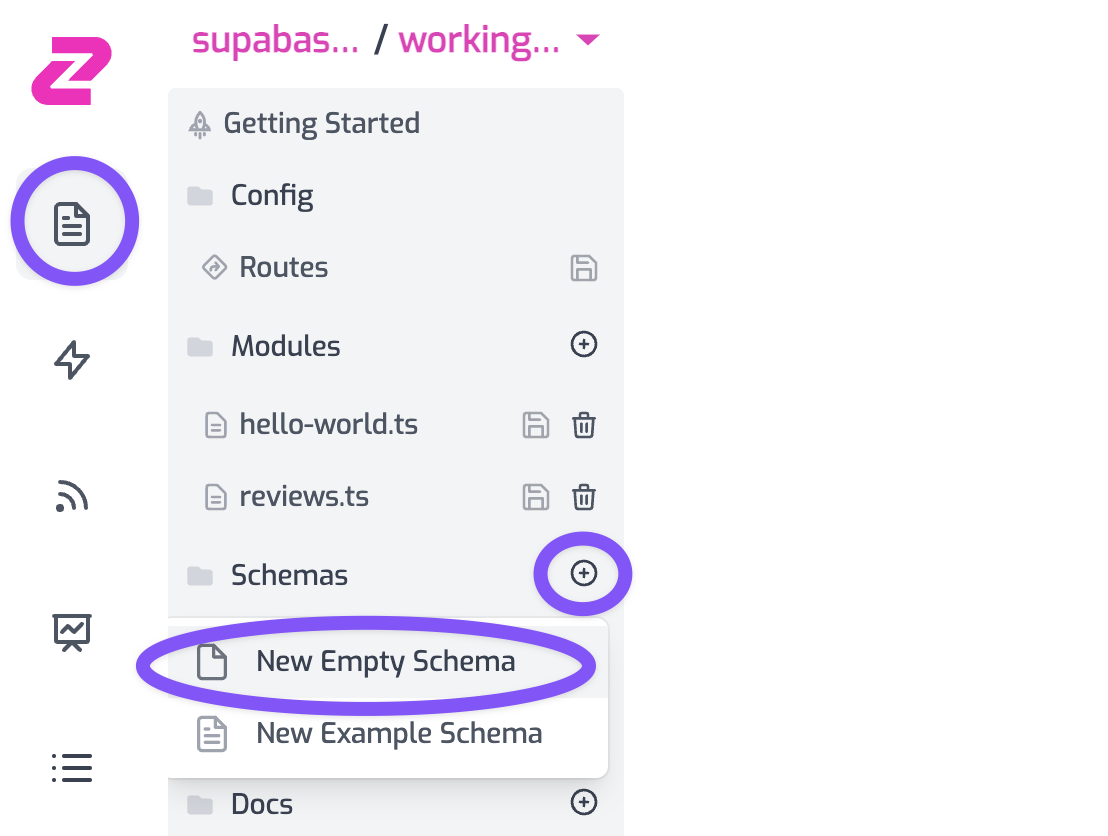
This example fits the ski-reviews table we described above

{
"$id": "http://example.com/example.json",
"type": "object",
"default": {},
"title": "Root Schema",
"required": ["make", "model", "rating", "year"],
"additionalProperties": false,
"properties": {
"make": {
"type": "string",
"default": "",
"title": "The make Schema",
"examples": ["DPS"]
},
"model": {
"type": "string",
"default": "",
"title": "The model Schema",
"examples": ["Pagoda"]
},
"rating": {
"type": "integer",
"default": 0,
"title": "The rating Schema",
"examples": [5]
},
"year": {
"type": "integer",
"default": 0,
"title": "The year Schema",
"examples": [2018]
}
},
"examples": [
{
"make": "DPS",
"model": "Pagoda",
"rating": 5,
"year": 2018,
"author": "Josh"
}
]
}

Now add a new policy to request pipeline for your Create new review route. Choose the JSON Body Validation policy and configure it to use your newly created JSON schema document:

{
"export": "ValidateJsonSchemaInbound",
"module": "$import(@zuplo/runtime)",
"options": {
"validator": "$import(./schemas/new-review.json)"
}
}

This policy can be dragged to the first position in your pipeline.

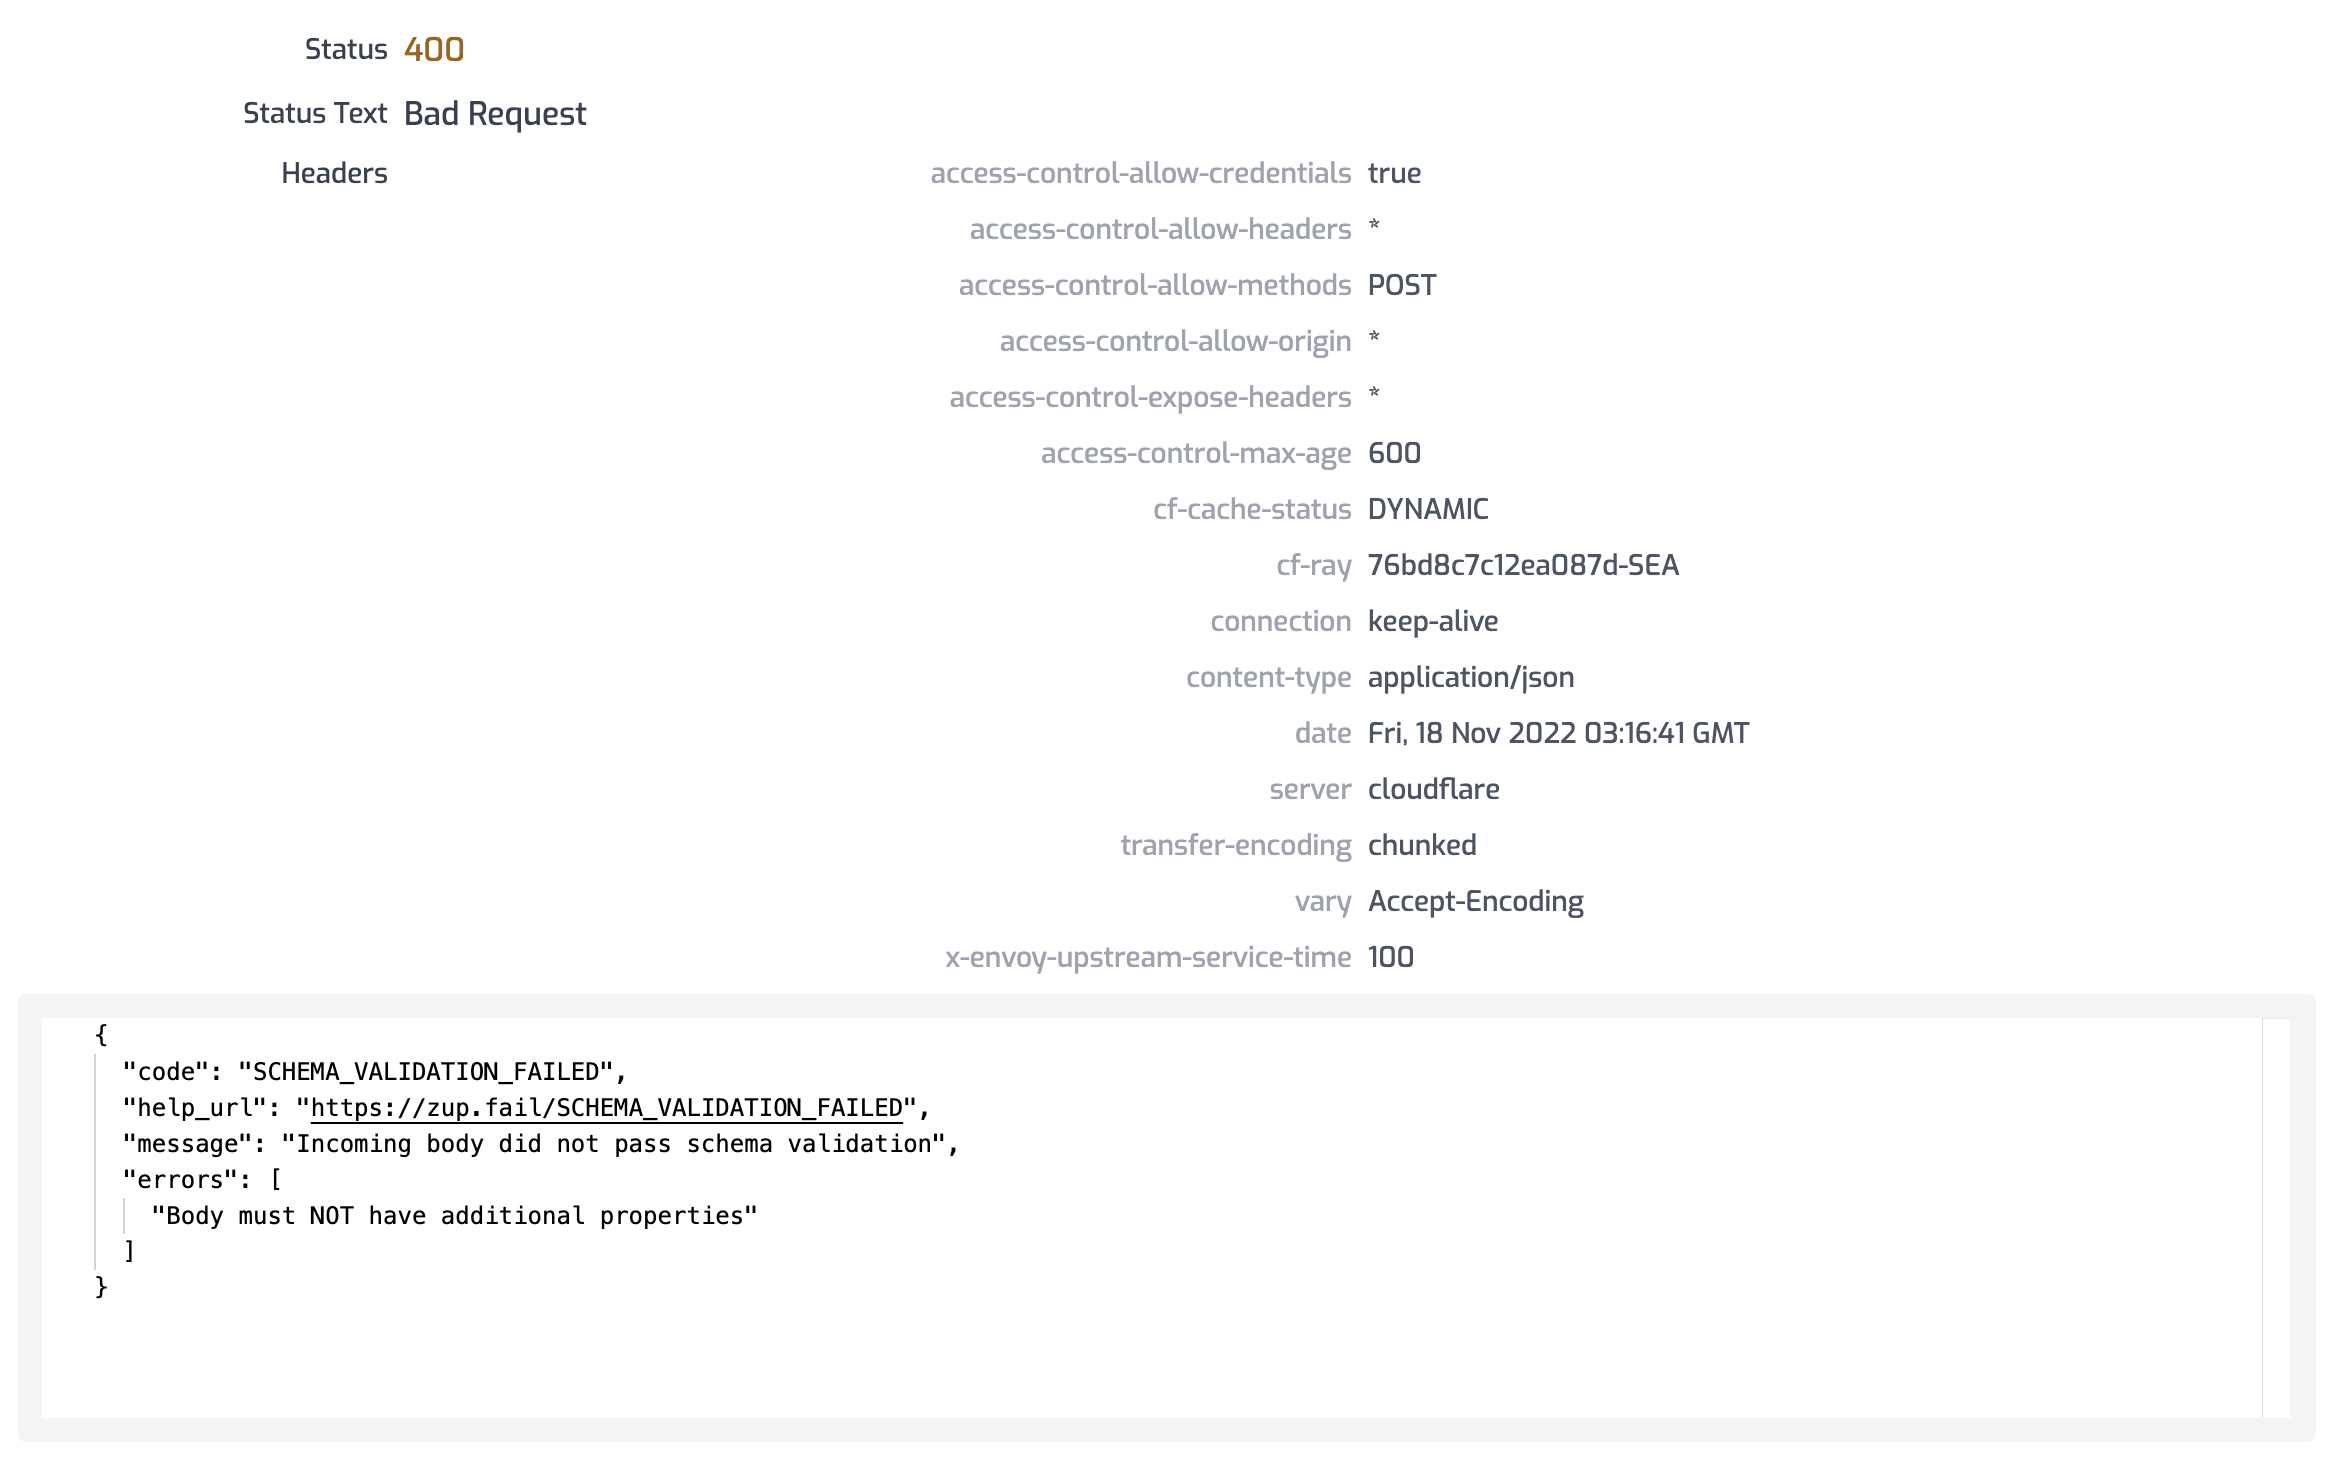
Now to test this is working, go back to your API test console and change the body of your create-review.json test to be invalid (add a new property for example). You should find that you get a 400 Bad Request response.

400 Bad Request

Finally, lean back and marvel at your beautiful Developer Portal that took almost zero effort to get this far, wow! Hopefully you already found the link for this when adding API key support :)

Developer Portal

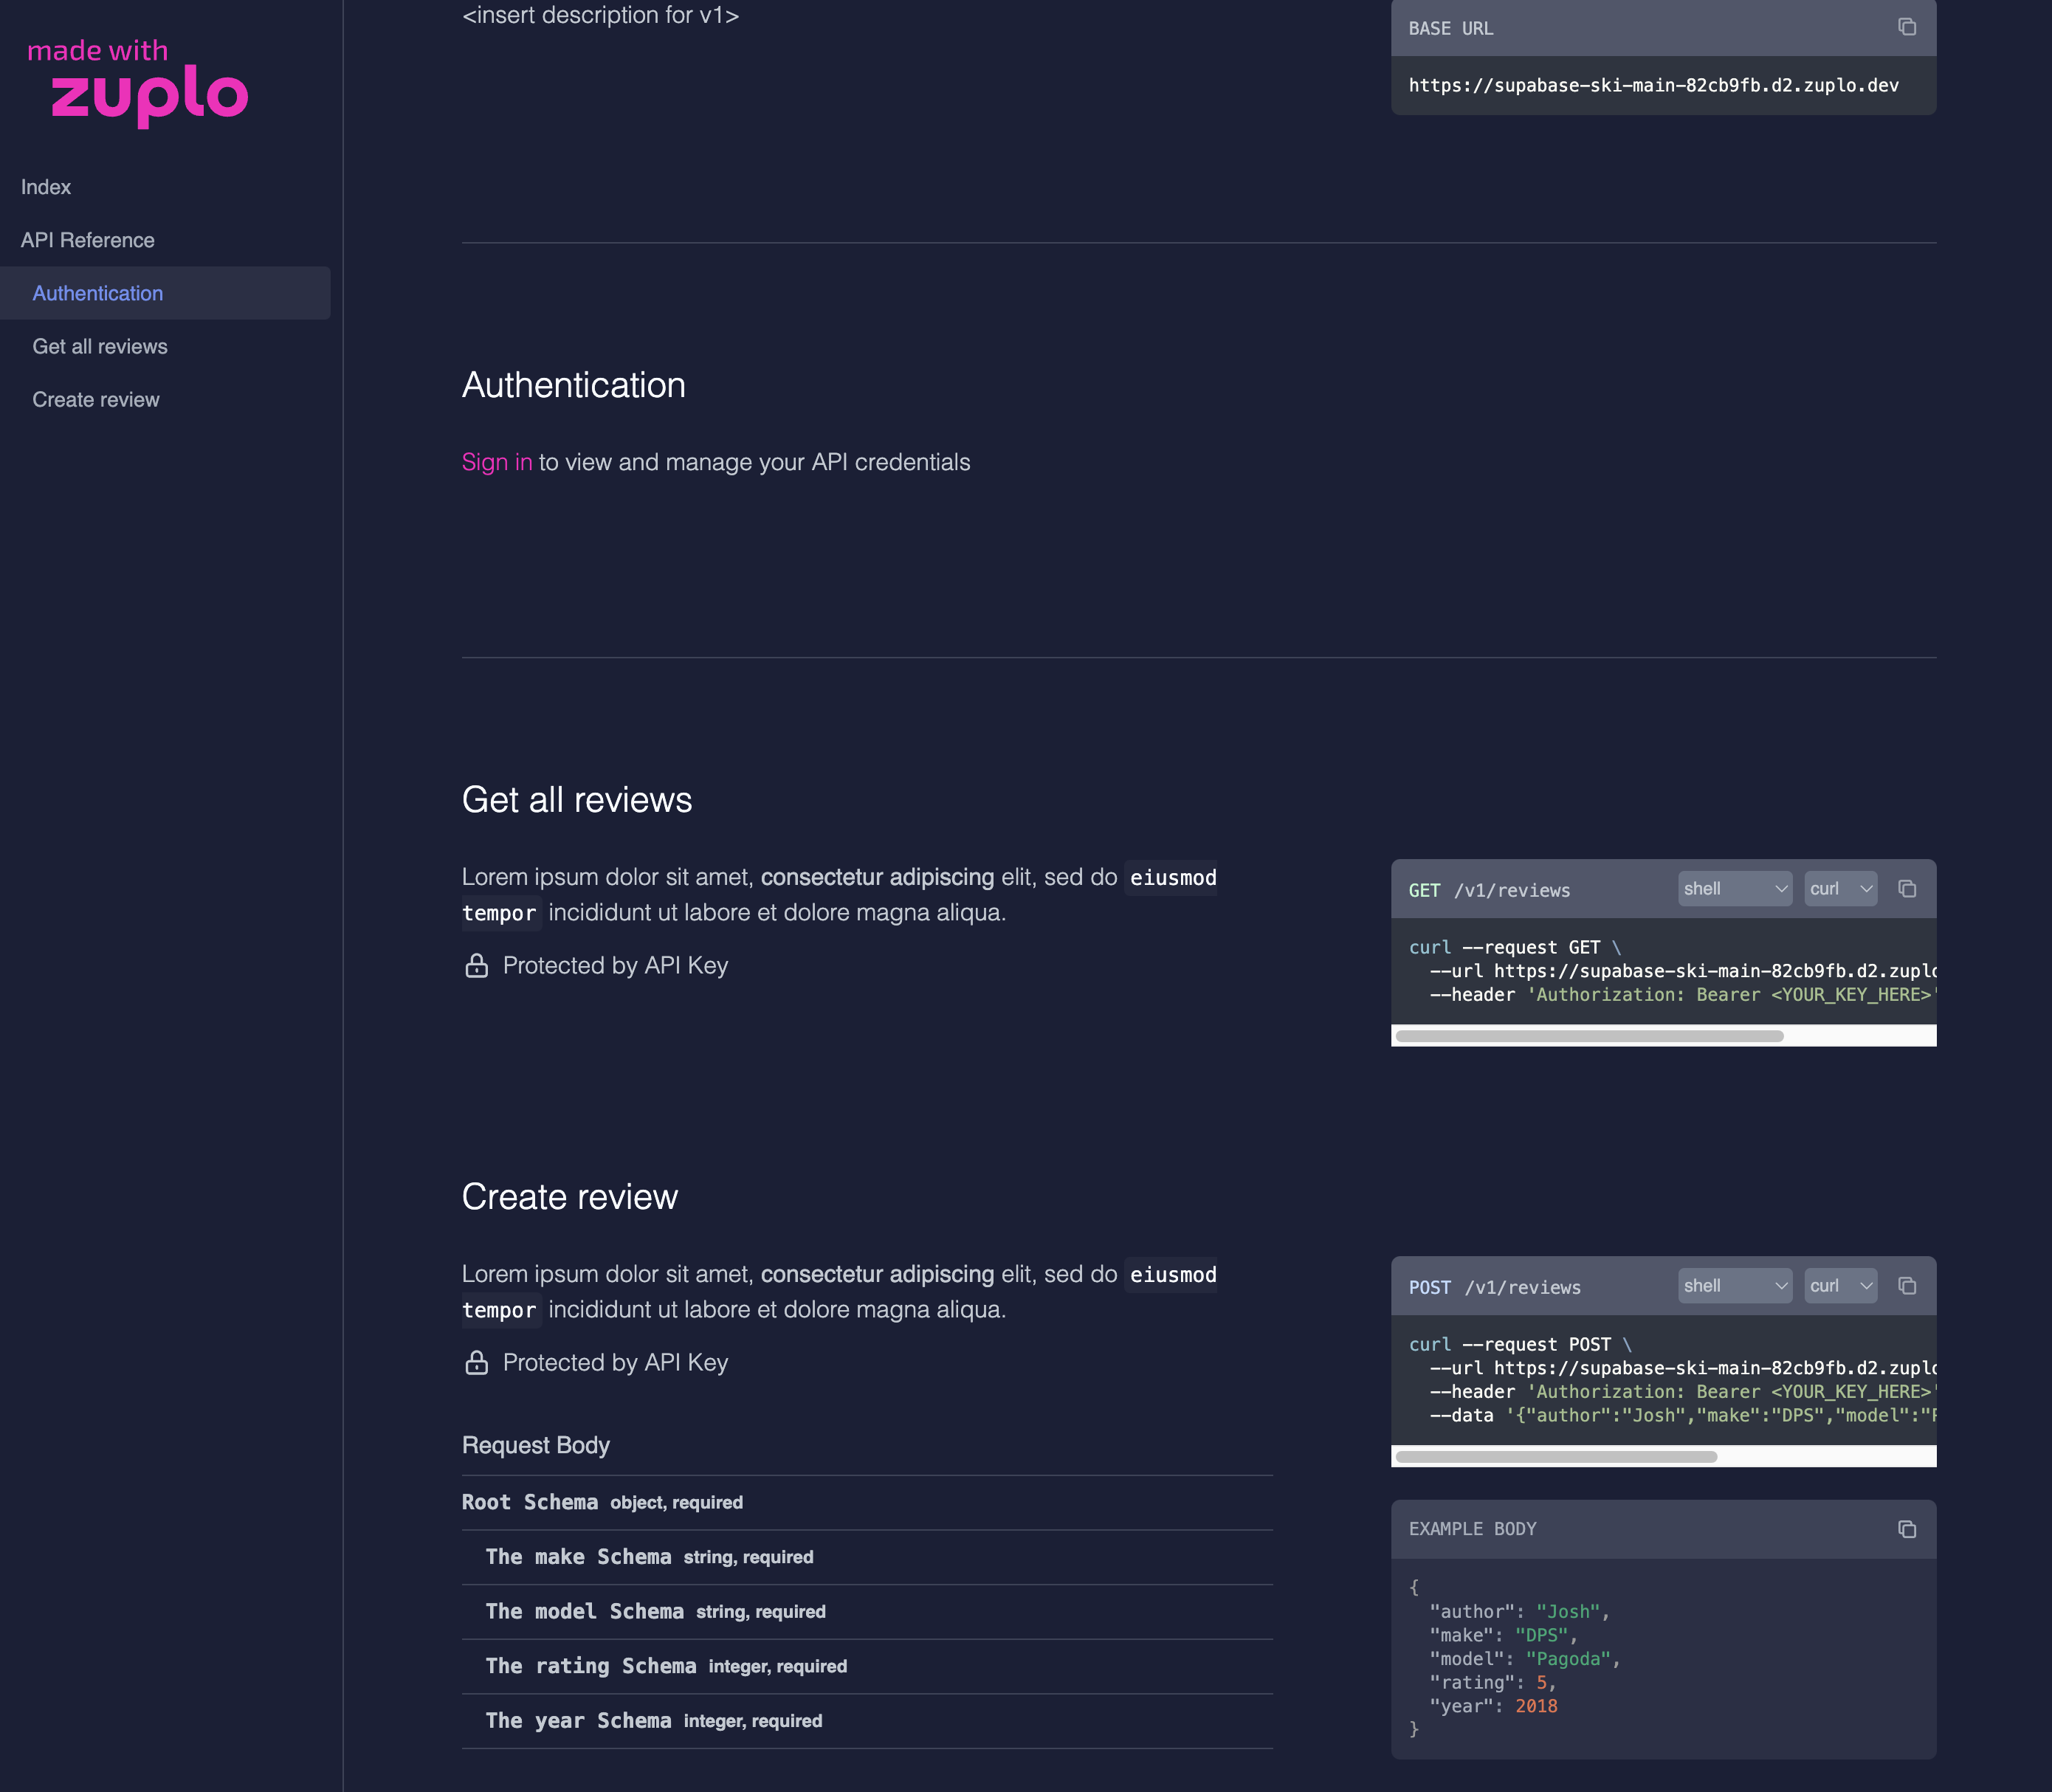
Get started with Zuplo for free today: Sign Up Free

See also:

API Authentication with Supabase JWT Tokens

Supa-dynamic rate-limiting based on data (using supabase)